The best career choice I’ve ever made was to learn how to start a blog (this blog).
This blog has helped me hone my business skills, become a better person, stop procrastinating, make some income, build new relationships, and inspire others to do the same.
Are you looking to do the same in 2021?
If you’re sitting there on your couch, contemplating starting a new blog, but are wondering… How the heck do I get started?
Well…. lucky you. I was in your shoes not long ago and I’m here to tell you that it’s not as hard as it seems.
There’s so much information out there on the internet on how to start a blog that it can get confusing and difficult to decide whom to trust.
In this guide I’ll walk you through the exact steps I took to start this blog. I promise it’ll be relatively easy and simple to follow along (no pointless jargon). Sounds good?
Awesome, let’s get started.
Disclosure and quick heads up – I started this blog on Bluehost and have now partnered with them to get you a great deal. If you make a purchase through this or any of the links on this post I’ll earn a small commission at no extra cost to you. I only promote things I use and love myself and i’m always transparent about it!
I created the table of contents below so you can skip to any point along the way. Bookmark this page and come back to it whenever you need it.
The 8 steps to start and monetize your blog
1. Pick a Name for Your Blog
This is a fun and critical step because your blog name is your brand. It’s how you’ll be remembered. But, don’t spend to much time here, what’s important is to take action and gain momentum.
What is a domain name and where do I get one?
When you type Bloggingpals.com into your web browser in order to visit this blog, that’s my blog’s name (domain name). In other words, a domain name is like your address. It tells everyone how to find you.
Here are a few things to consider when naming your blog:
- Choose a .com over others. It’s the most popular and easiest to remember.
- Three words max. Unfortunately, most single-word domains are taken but two or three is OK.
- Try to use a keyword that represents what your blog is about. Example: Bloggingpals.com, “blogging” is the keyword that lets you know what the blog is about.
- For personal brand blogs, use your name if possible.
- Don’t use numbers or hyphens. They’re difficult to remember.
Grab Your Domain Name in 30 Seconds.
Take 30 seconds right now to register your domain name and hosting with Bluehost, the largest and most well-known hosting company in the world. Get started for under $4 a month (plus you will get a free domain name).
You can buy a domain name from a number of companies that charge a yearly fee of around $10. However, by using the link I provided above, you’ll get the first year free.
Side Note: Domain registration and hosting are two different things. I will get into hosting in the next step, but you should know that most companies do one or the other. Luckily for you, Bluehost does both, so that’s one less step to take.
OK, so let’s find your blog a name that’s not already taken:
Enter Your Blogs Name Below and Click Check
This checker automatically assumes that you’re looking for a .com so just enter the name you want and click check.
The results will appear right away: Red box means it’s taken, whereas green means you are good to go.
Don’t get frustrated if most of your names are taken. Keep trying, until you find one that’s available.
If you need help, contact me and I’ll do my best to help you find a suitable name for your new blog.
Below is some additional info on this subject:
This is one of the most frequently asked questions I get from people who want to learn how to start a blog.
As we established earlier, the name of your blog is how you’ll be remembered so even though I don’t want you spending too much time on this, I do want you to pick a name that sticks.
Some gurus recommend that you pick whatever name comes to mind and change it later if need be, but this is horrible advice.
Changing your blogs name is like moving to a new address. You have to tell everyone your new address, go to the post office to forward your mail, etc.
In the case of your blog, you have to forward your old name to the new one which normally causes a huge drop in traffic from search engines like Google, Yahoo, and Bing.
Not to mention that you have to explain everything to your readers so choosing a blog name just for the heck of it because it can be changed later is not an option for us.
So… How do you pick a suitable name for your blog?
1. Decide on your niche… What will your blog be about
This is the key. You must know what you’ll be blogging about before coming up with a proper name for your new blog.
Ask yourself what could you see yourself blogging about all day and not feel like its a chore.
Your answer to that question will help us come up with a great name for your new blog.
2. Do a little research on your niche
For the purpose of this exercise, we will assume you chose to blog about dog training.
- Go to Google and search “dog training blogs”
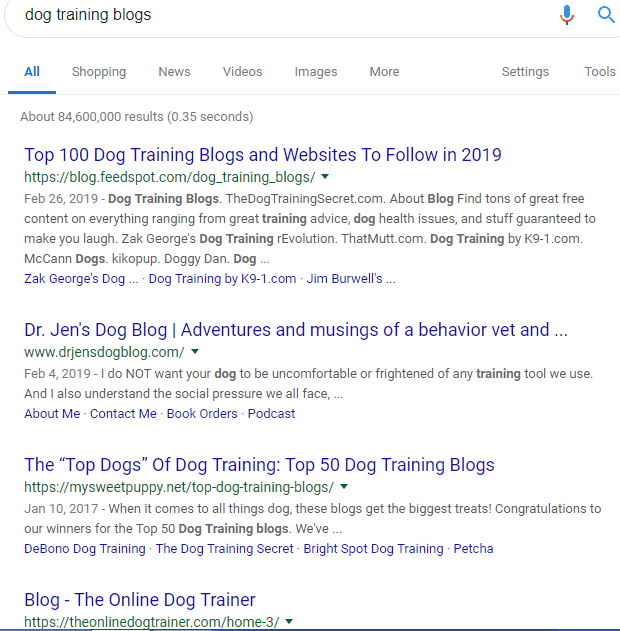
We don’t want to go crazy here. Any blog showing up on the first page is most likely a competitor.
See what they are blogging about and pay close attention to their blog names. Perhaps you can get some inspiration from them.
- Based on your findings start jotting down names and check availability
If you wish to be the brand this is easy because you can just use different variations of your name and you’re good to go.
When I started this blog, I had a list of about 20 names that I liked. I didn’t check for availability and later found that most were unavailable.
One of the unavailable domain names was “bloggingfriends” which shouldn’t have been a shocker but I was disappointed nonetheless.
Wanting to stay along those lines, I checked the thesaurus and picked a few synonyms that I liked and KaBoom… BloggingPals was born.
For this exercise, I came up with “dogtrainingdoc, and “dogtrainingdr” which are both available.
Need more help?
Contact me and I will try to help you come up with a nice name for your new blog.
Once you find a blog name that’s available, we will need to register it with Bluehost.
We will do this in conjunction with choosing a hosting provider in step 2.
2. Chose a Hosting Provider
The second step is choosing a web host. A web host is a company that provides hosting services that allow your blog to be accessed through the internet.
Without web hosting, your blog can’t be seen online.
Haven’t registered your domain name yet? You’ll need it to start your new blog.
Take 30 seconds right now to register your domain name and hosting with Bluehost, the largest and most well-known hosting company in the world. Get started for under $4 a month (plus you will get a free domain name).
Why I chose Bluehost:
- They are the #1 recommended web host provider by wordpress.org.
- 24/7 USA based customer support… Yes, I have used them and they haven’t failed me yet.
- Affordable. I started for only $2.95 a month.
- They offer free registration of your blog name for a year.
- Free SSL Certificate (This protects your blog from cyber attacks)
- 30-day Money-back guarantee if you’re unsatisfied for any reason.
- They offer free, simple installation of the WordPress blogging software (which I’ll show you below).
Are you itching to register your blog’s name and get your hosting setup?
Here’s what the (simple) step-by-step web host sign up and domain name selection process looks like.
Click on the following link: https://www.bluehost.com/track/mcruzcairo/

Next, you’ll click on the green “Get Started” button and you’ll be taken over to the next page.
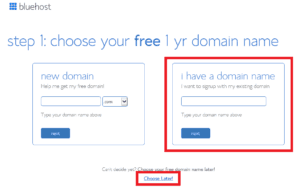
Here you’ll enter your blog name (domain name) and click next. You can choose to skip this step by clicking (Choose Later) at the bottom of the page.
Next, you’ll select the plan that best suits your needs.
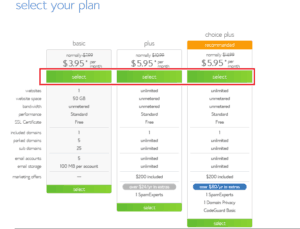
When I was starting out, I went with the Choice Plus plan because I wanted to register multiple blogs and wanted to take advantage of the $200 marketing offer which is included with the plan.
However, the Basic plan is more than enough for anyone starting out.
Below are some things to consider while choosing your plan:
- How many blogs are you registering: Basic only allows 1, the others are unlimited.
- Will videos be your main form of content: Videos are a popular form of content, but they eat up a ton of space. Consider getting an unlimited space plan if you’ll be uploading videos to your blog.
- Privacy: Choice Plus plan includes the Domain Privacy feature which protects your personal information online.
Once again, I believe the Basic plan should be enough for you and if needed you can always upgrade in the future.
Next, you need to create an account and enter package information
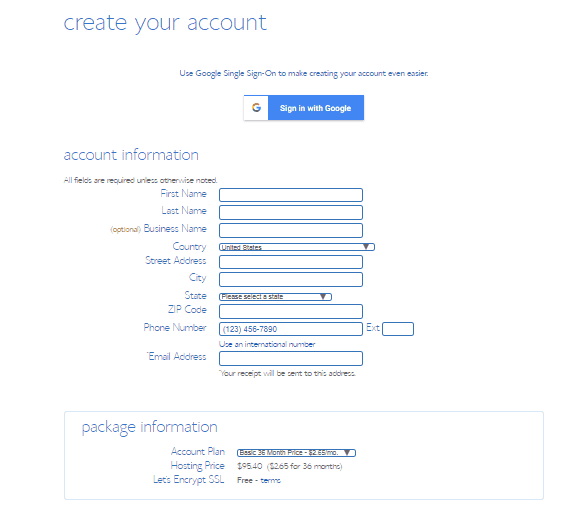
Fill in the information on this screen or choose to sign in with your Google account. I keep everything separate, but it’s up to you.
Note: Bluehost plans are billed annually and normally to get the lowest price possible you’ll need to sign up for three years. Unfortunately, they don’t offer a monthly payment option (hosts that do charge a lot more).
Scroll down the page to enter your billing information:
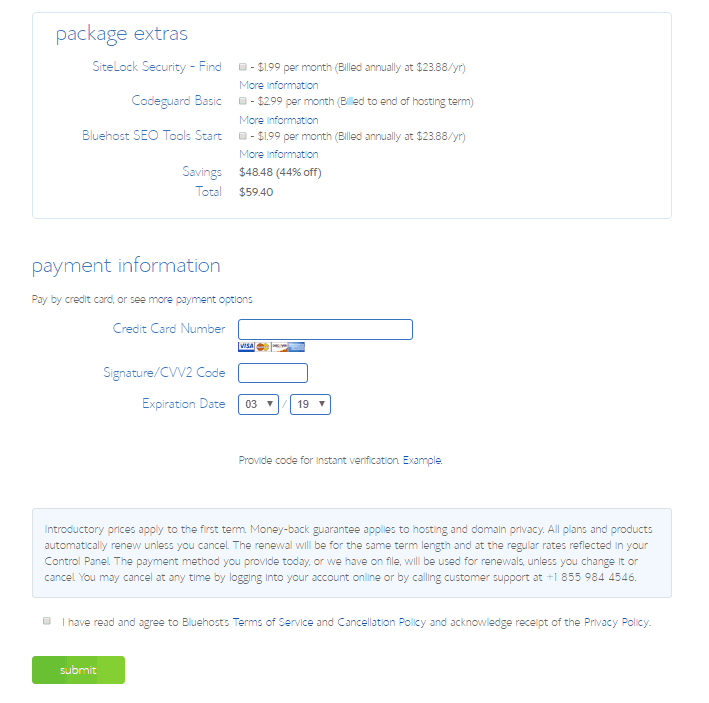
Click Submit!!!
****Congratulations you now have a blog name and web hosting setup****
There are countless web hosts, like Bluehost, GoDaddy, SiteGround, HostGator, WPengine or thousands of others.
To be honest, the only other web hosts I considered were SiteGround and WPengine because of their reputation.
Both are great and I have nothing bad to say about them.
I went against WPengine because their cheapest monthly rate is $35 and I think that’s too much to pay to start out.
I can’t speak for their customer service or up-time because I have never tried them, but I hear great things about them so if pricing is not an issue for you then consider these guys.
Siteground is the other host I considered and they are very competitively priced when compared against BlueHost, but I preferred the BlueHost dashboard (we will get into the dashboard in step 3 while installing WordPress). and this is the honest truth as to why I went with BlueHost instead. I heard great things about both and the price difference was only $1 so I didn’t care about that.
I haven’t heard many great things about GoDaddy so they were discarded right away, and even though HostGator is owned by the same company as BlueHost they just didn’t click with me.
Note: I am not saying these things because of my partnership with BlueHost. I would never recommend a product that I do not use myself, but if the product is good I see no reason for bashing them. Also, I could make more money promoting WPengine or SiteGround because they pay higher fees through their affiliate programs, but I don’t use them so I see no reason to sell out for an extra buck.
Another major reason why I went with BlueHost was that they have been the #1 recommended host since 2005 by WordPress which says a lot. They also recommend SiteGround so now you know why I was so intrigued by them.
With the initial signup process complete, You’re now ready to set up your new blog and start publishing amazing content.
On the next step, you’ll be guided step-by-step through the process of getting your WordPress installation set up.
3. Install WordPress
Now I’ll guide you through the process of getting your WordPress blog set up — and later on, I’ll share with you my favorite WordPress plugins to make your blog function like a champ.
Once you finish creating your account on the previous step. BlueHost will ask you to create a password for your new account. Enter your password and it will take you to a screen to choose a blog theme.
Skip this step and go to your dashboard which should look something like this:
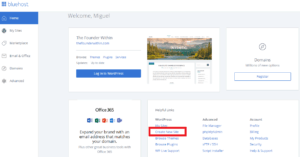
Your dashboard will look a little different since you won’t have any blogs setup yet, but the dashboard is where you’ll have access to all the properties you register with Bluehost.
Click on “create new site” where you see the red box.
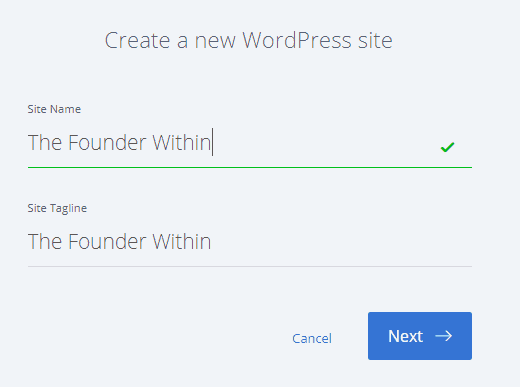
Here you will need to enter your blogs name and a tagline.
- Use something that describes what your blog is about in the tagline field.
Click Next…
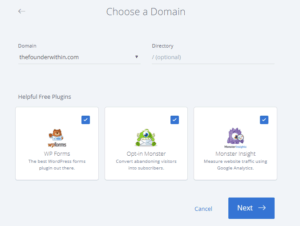
Now you will choose your blog.
Note: If you only have one just click next.
- As you can see at the bottom, they give you the options to install some helpful plugins. I like those three so I leave them checked, but you might get different options so you can uncheck them if unsure… I will give you a list of my favorite plugins later on.
****Congratulations… you have successfully installed WordPress on our blog****
Simply put, WordPress is a type of software you can use to create your own website, blog, or application.
WordPress allows you to build and manage your own full-featured blog using your web browser without having to learn how to code.
In other words, it allows you to create a blog without being a techie.
Benefits of WordPress:
- Free
- Open source (anybody can use it and make changes to it)
- Easily customizable
- Powers over 32% of all websites in the word
- Has millions of free themes (basically a fully designed blog)
Other competitors such as Blogger and Wix lag far behind WordPress in popularity, user-friendliness, and overall quality.
Now that you’ve installed WordPress, it’s time to choose a theme and design your new blog. Continue along to step 4 where I will help you in this matter.
4. Design Your Blog With a Free WordPress Theme
Now it’s time to turn your blank canvas into a work of art.
In the blogging world, WordPress designs are called themes.
Out of the box, your blog will look something like this:
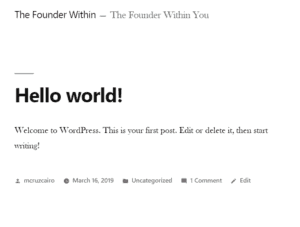
Not bad but I think we can do better, don’t you?
There are thousands of themes to choose from. But, don’t get trapped in “Shiny New Object Syndrome” and not walk away with anything.
You can modify your theme anytime, so don’t get too caught up with all the bells and whistles to start out.
First, you need to go to your dashboard and login to your blog.
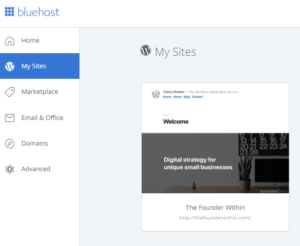
In your dashboard, go to “My Sites” on the top left, and hover over your blog which will appear on the right side.
You will see a “Login to WordPress” icon appear. Press login and it will take you to the WordPress Dashboard.
Note: There are several ways to reach your WordPress dashboard. You will receive an email from Bluehost showing you a different way after installing WordPress in step 3.
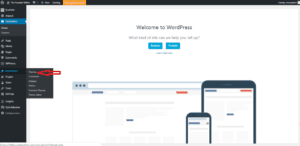
WordPress comes built-in with several themes already – their “twenty..” themes.
Instead, we’ll search for a nicer looking theme that will instantly make you blush.
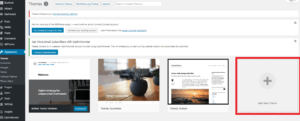
Click on “Add New Theme.”
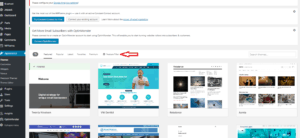
Your tastes and mine are probably different and depending on what type of blog your building there might be special features you want.
Fortunately, WordPress has a “Feature Filter” that allows you to search for something that will fit your style.
- I chose Blog, Custom Header, Footer Widget, and Grid Layout for this exercise.
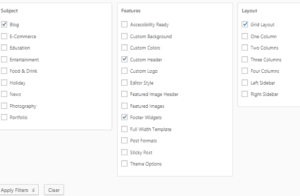
You can choose anything you’d like.
Below are my results:

I chose “vintage blog” but you can continue scrolling down to find something more to your liking.
If you want to see what your blog will look like before choosing a theme, you can click on the theme’s thumbnail and get an instant preview.
Once you find a theme that satisfies your taste, click the “install” button and Activate it.
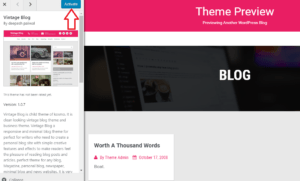
By now, your theme should be activated and ready to go.
Assuming you found the theme of your dreams, you’re probably not looking to make any design changes to it, but just in case let’s do some design changes so you can see how easy it is to do so.
Themes are the foundation of your blogs design and core functionalities. However, there are endless customizations you can make to it.
Most customizations are done through plugins that add or extend functionalities such as contact forms, sliders, forums, pop-ups and so on.
The first step is to hit customize on your active theme.
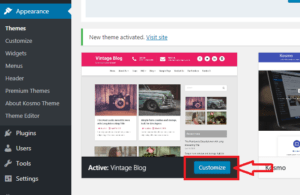
Once you hit customize, you’ll be taken to this next screen where you can change just about anything on your blog.
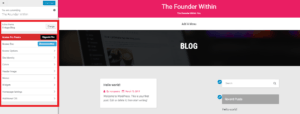
The highlighted box on the left is where you can change anything from the title, color, text, or menus on your blog.
Make any changes you wish and hit publish at the very top in order for your changes to take place.
Now that you have designed your blog and made the appearance changes necessary, let’s move on to creating your essential pages.
5. Create Your Essential Pages (About, Contact, Privacy)
Your blog needs to showcase some foundational information:
- Who you are
- Why people should listen to you
- How can they contact you
- Privacy policy
These pages are pretty standard on all blogs, but they’re also a great way to showcase your personality to potential customers.
Especially your about me page. This is the one page where you can focus on allowing your readers to get to know you, your business, and how you work.
Here are some step-by-step instructions for how you can create an about page that accomplished that:
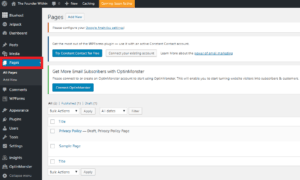
- Click on “Pages” in your WordPress admin page.
2. Click “Add New”
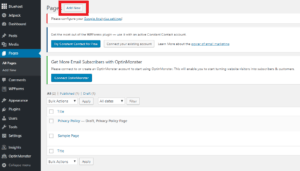
3. Fill in the page with your information and use the menus on the left to add images, preview your changes, and publish (create) the page.

4. Go to Appearance -> Customize -> Menus -> Create New Menu -> Enter Menu Name (About Me) -> Choose “About Me” -> Add Item -> Check Mark Primary Menu -> Publish
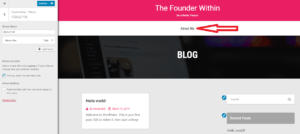
Note: Depending on the theme you chose, the location of the menu where your “About Me” page will show up on your home page might be different than what you see above.
Follow the above instructions to create any page you wish to add to your blog. If you don’t want it to show up on your home page, skip check marking “Primary Menu.”
You might not think much of it, but your About Me page can quickly become one of the most popular pages on your blog.
People visiting your site will want to know who you are and what you’re all about. They’ll be intrigued to know more about the person they’re getting advice from.
Therefore, it’s important that your About Me page has the following information:
1. Who is your blog for
Most people that arrive on your blog do so because they are looking for answers — be it on “how to start a blog” or “who is the most popular person in the world.”
They find your blog by running a search on sites such as Google, by recommendations, or through social media.
This means that most people will already have an idea of what your blog is about even before reaching it.
However, their idea is based on first contact. It’s up to you to make sure that person knows exactly what your blog is about and who it is for.
2. What value will you create for them
It might be called an About Me page, but you don’t want to make the mistake of only talking about yourself.
Yes, you’ll introduce yourself and provide some background information, but your About Me page should be more about your readers and what value you can create for them than yourself.
Remember… you aren’t going to become a customer for yourself but your readers will. That’s why you want to make sure they know what value you will create for them.
3. Why should they listen to you
If you’ve kept your readers’ attention to this point, they should have a good idea of who you are and be able to decide whether or not to continue reading about you.
However, here is where you should talk a bit more about yourself and sell them on the idea of following your blog.
4. Where should they go next
Lastly, tell your readers what to do next.
Would you like them to read a specific blog post? Follow you on Pinterest? Sign up for your new course?
Most bloggers don’t do this, but this step is of utmost importance.
Example: My ideal reader is someone who wants to learn how to start a blog, grow its traffic, and generate an income. Therefore, this is the one article I’d like everyone visiting my blog to read. If they already have a blog, they’ll know how to look around for what they need.
Now that you’ve created the required pages for your blog, it’s time to make your blog Google friendly.
6. Make Your Blog SEO Friendly
Search engine optimization (SEO) is the process of affecting the online visibility of a blog or a web page in a web search engine’s unpaid results—often referred to as “natural”, “organic”, or “earned” results. In general, the earlier (or higher ranked on the search results page), and more frequently a website appears in the search results list, the more visitors it will receive from the search engine’s users; these visitors can then be converted into customers
That’s a lot to take it — basically, if your site is SEO friendly, it has a better chance of generating unpaid traffic from search engines such as Google, Bing, and Yahoo.
Making your blog SEO friendly might sound like a daunting task but I’ve got you covered.
Note: Because Google processes over 90% of searches done in the USA, we will focus on them. However, everything we do in this section will make your blog more friendly to all search engines.
First, let’s install Yoast SEO on your blog:
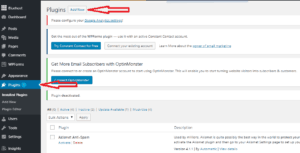
- Click on Plugins
- Chose Add New
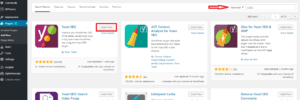
- Search for Yoast
- Click Install Now
- Once the installation is finished, click Activate
Now that you’ve installed Yoast SEO on your blog, it’s time to set it up.
Once Yoast SEO is activated, you’ll notice a new option called “SEO” on your dashboard’s menu:
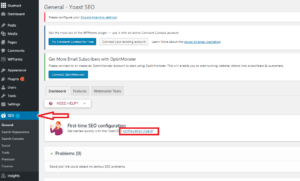
- Click on SEO
- Run the Configuration Wizard
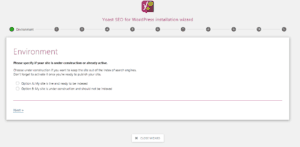
- Follow the prompts and answer all questions
Once you finish running the Yoast SEO configuration wizard, your blog will be properly optimized for the search engines and you’ll have access to the Google Search Console… gives you access to your blog’s traffic stats.
Note: Make sure to fill in the Yoast SEO information every time you write a new blog post. This will ensure your blog posts are properly seen by Google.
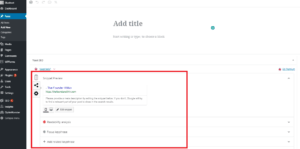
If not sure about filling in any section in the Yoast SEO area, click on the question mark shown above that section to get a better understanding of what you need to do.
By now you should have picked a name for your blog, decided on a hosting provider, installed WordPress, designed your blog, created essential pages, and made your blog SEO friendly.
Now it’s time to write your first masterpiece.
7. Write Your First Masterpiece and Promote it

If you’ve made it this far, you should be in excellent shape on your journey of learning how to start a blog and make money.
The backbone of your blog is going to be your blog posts. Therefore you want to make sure each post you publish is a masterpiece.
However, it doesn’t stop there. You must promote those masterpieces in order for your blog’s traffic to grown and earn you some money.
First, I’ll tell you the 12 must-have ingredients of a successful blog post:
#1. Irresistible Headline
On average 8 out of 10 people will read headline copy, but only 2 out of 10 will read the rest.
Your headline is the first impression you’ll make on a prospective reader. If your headline doesn’t grab their attention, there’s no way they’ll click on it and read the rest.
Your headline must accomplish the following:
Irresistible headlines must accomplish the following:
- Define what the article is about.
- Encourage browsers to click through.
- Use keywords: These are words that you would like the article to rank for.
Need more guidance on writing an irresistible headline? I put together a list of 199 title ideas for your next blog post which is a must read for you.
#2. Compelling Lead
I love the following quote by William Zinsser:
“The most important sentence in any article is the first one. If it doesn’t induce the reader to proceed to the second sentence, your article is dead. And if the second sentence doesn’t induce him to continue to the third sentence, it’s equally dead. Of such a progression of sentences, each tugging the reader forward until … safely hooked, a writer constructs that fateful unit: the lead.”
In other words, once you hook the reader with an irresistible headline, you’ll need a captivating lead to make them want to continue reading.
Your leads sole purpose is to let the reader know what to expect from your blog post and to make them want more. Therefore don’t ramble too much.
If you’re having trouble writing your lead, see Neil Patel’s ultimate guide to writing blog post introductions.
#3. Appealing Graphics
Graphics make reading more pleasurable. According to a study by Xerox, colored visuals increase people’s willingness to read a piece of content by 80%.
Why you might ask?
Graphics help break up the text within the body of your blog post. Not to mention they make blog posts more visually pleasing and easier to share on social media.
You can use your own graphics, buy them, or use sites such as Pixabay and Unsplash to find royalty free images.
#4. Useful Headings and Subheadings
Headings and subheadings have two main purposes:
- They break up the type to make the post more visually appealing to its readers.
- They help readers navigate to important sections.
A great example of how to use headings and subheadings is this very post on how to start a blog and make money. Can you imagine reading over 5,000 words without any breaks in the type?
You probably wouldn’t go beyond the first two paragraphs. Therefore, be sure to make good use of headings and subheadings in all of your blog posts.
#5. Authenticity
This is very important for your brand and your blog’s success.
Being authentic in your writing will differentiate you from other bloggers in your niche. This will ensure that every reader coming to your blog is introduced your style and personality.
Many bloggers make the mistake of trying to sound like everybody else. That can work, but having your own voice will create a special bond between you and your readers.
This bond is what will make them want to follow your every word and eventually become your customers.
Do study your competition and learn as much as you can from them, but always put your own spin on things.
#6. Internal Links
Internal links are links that connect different pages on your blog together.
Example: Next time you’re feeling down, I’ve put together a blog post with some amazing motivational quotes to get you going.
The above link takes you to another blog post on this blog… in other words, it’s an internal link.
Internal links help your readers find other helpful pages on your blog and also helps search engines get a better understanding of your blog’s structure.
When starting out you won’t have other posts to link to. However, you can go back to your earlier posts and link them whenever relevancy permits.
Try to include several internal links in all of your blog posts if possible… don’t force it though. Only link to other posts or pages on your blog if it adds value to your topic.
#7. External Links
External links are links that connect pages on different blogs together.
Example: MOZ put together a post explaining the intricacies of external links.
The above link takes you to a post explaining external links on MOZ’s website.
As you can see relevancy is key with any kind of links. In this case, this link gives credence to the article on MOZ, as well as provide my readers with additional information on this topic.
Just about every article you’ll write will be able to get a boost from additional information on other blogs.
This blog post is about how to start a new blog and make money. Therefore I’ll be touching topics that I cannot go in-depth on, but I can provide my readers with additional information on those topics by referencing other blogs.
External links provide your readers with insightful information, as well as let Google know the importance and relevance of the page you are referencing.
Yes — in the blogosphere, helping others benefits you.
#8. SEO (Search Engine Optimization)
Have you installed the Yoast SEO plugin on your blog yet? if not, go back to section six of this article and do so. Follow the instruction provided in that section and you’ll be mostly there when it comes to SEO.
Aside from that, below is an infographic created by Brian Dean with additional SEO information to consider while writing your blog posts.

Infographic source: Backlinko
#9. Substantial Length
Studies have shown that the average length of blog posts ranking in the top three results on Google is around 2,400 words.

Even lower-ranked blog posts on the first page are 2,000+ words in length.
Therefore, you want to strive for 2,000+ words every time you write a new blog post.
I don’t recommend forcing it though. If the topic you’re writing about can be covered in-depth in under 2,000 words that’s fine… these are averages which means some are shorter and others are longer.
Cover your topics thoroughly and you won’t have to worry about content length. Don’t fall into the trap of yapping just to reach “x” amount of words though. Provide your readers with well-researched information and you’ll find that most of your blog posts will go beyond these averages.
#10. Proper Grammar and Spelling
This is common sense — no one is going to take you seriously if you can’t spell or write a proper sentence.
Not trying to say you need to be a grammar savant, but you need to at least handle the basics.
English is my second language so I constantly struggle with my writing, but by studying others and learning proper sentence structure I have been able to improve my writing to the point where I feel good about my writing skills.
I always have a thesaurus and dictionary handy while writing blog posts. These tools will help you immensely with your spelling and the growth of your vocabulary.
WordPress comes with its own spell checker which also helps, but I prefer using an app called Grammarly. This app helps correct your Grammar, spelling, and punctuation errors.
There’s a paid version that has additional features but I wouldn’t bother as the free version does a fine job.
The best advice that I can give you is to write clear sentences, stay away from long paragraphs, and always double-check for spelling errors.
Most people aren’t worried about whether you know the proper usage of semicolons and other smallish grammar mistakes that most bloggers make.
#11. Call to Action
Every blog post you write should have a larger purpose beyond that of just providing useful information to your readers.
You spend a lot of time writing magnificent articles and you should be rewarded for it.
This is where your call to action comes in play. This is simply an action that you want your readers to take.
It doesn’t have to be to buy a product. Your call to action can be to share your blog post, post a comment, or to become an email subscriber.
#12. Summary
Have you noticed how every court case you see on TV ends with closing statements from both sides which summarize the key arguments each side has, and ask for a specific action to be taken?
There’s a reason for that. This is to remind the jury or judge what the case is about and bring to light each sides main arguments and expected results.
This is also true for blog posts. It’s imperative that you end with a closing statement summarizing your key points and stating your call to action.
Next, we need to promote your masterpiece:
For every hour that you spend writing a blog post, you should spend four promoting it. Yes, that’s right… spend 20% of your time writing and 80% promoting.
You can spend all day writing the greatest article on “XYZ” but if no one finds it… does it even matter?
If you want to make money as a blogger, you must get comfortable promoting your blog and everything associated with it.
No traffic = no money! Simple as that.
So let’s take a look at the 9 things you must do after publishing every blog post:
1. Persuade Influencers to Spread the Word
If you arrived at this page wanting to learn how to start a blog it most likely means that you don’t have influential friends in the blogosphere.
Therefore, this is the most important step in helping you grow your blog’s traffic.
Influencers have large followings that hang on their every word. Getting them to share your blog posts with their readers is the quickest way to skyrocket your blog’s traffic.
You probably already know some of the influencers within your niche, but just in case let me show you how to easily find them.
Head over to Buzzsumo and search for your blog topic.
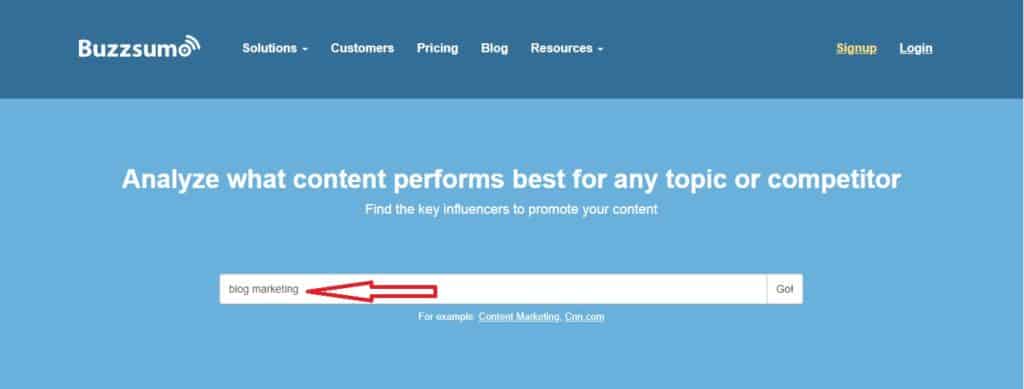
Hit Go!
Here you will see your search results:
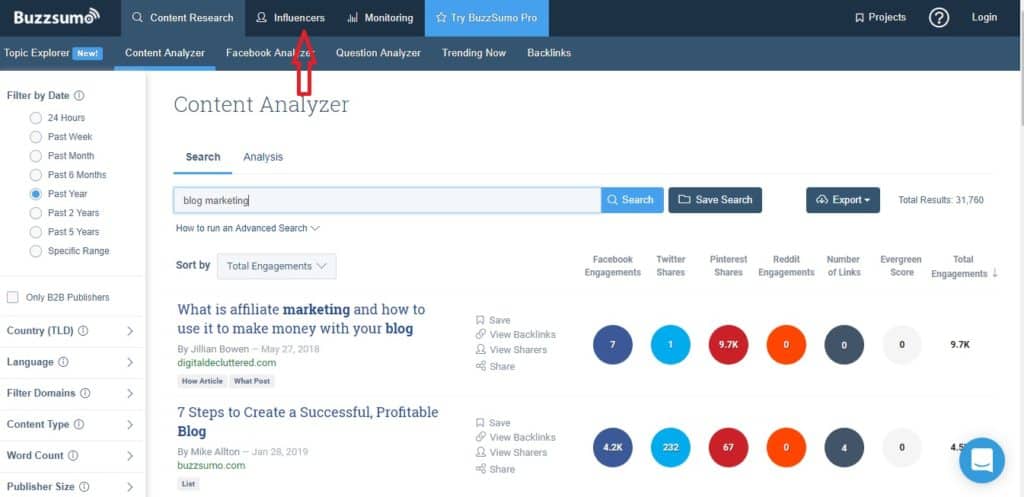
Click the Influencers tab.
Click search… This will bring up a list of the top influencers who share content related to your topic.
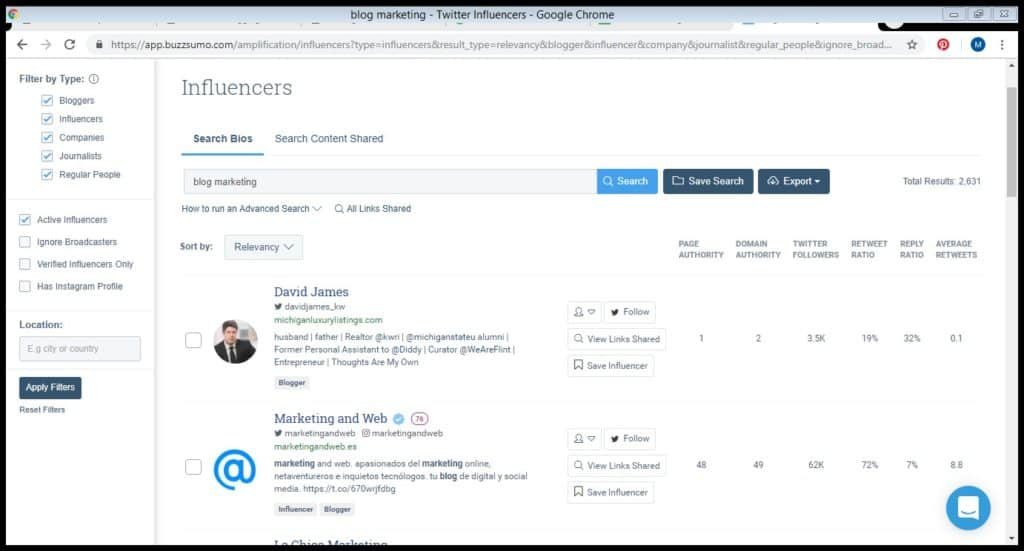
Don’t be shy!
Reach out to every influencer showing up in the results.
NOTE: Buzzsumo limits you to five searches per day and only shows the top 10 results. To get unlimited access to their database you must pay a minimum of $79 per month.
That’s a to be paying every month for most first time bloggers.
Use their 7-day free trial to gather as much information as possible.
Once your free trial ends. You can pay up or use my favorite FREE way of finding influencers…
Google!

Google is my go-to site for anything related to research.
Using Google to find influencers requires a little extra work, but it’s free, will help you become a better researcher, and provide the most diverse results.
Here is the simple step-by-step process you can use to find influencers on Google:
- Visit Google.com and search for your blog topic, niche, or keywords.
- Review the results and click on the most relevant ones.
- Find the contact information of the website owner and contact them.
Keep in mind that if you simply ask most people to share your blog post they won’t bother. Add value for them by mentioning them in your post or finding broken links on their website. Find something that of value that you can for them and they’ll be more likely to reciprocate your generosity.
Buzzumo and Google are my favorite tools for finding influencers, but influencers are everything.
Use your imagination!!!
Sometimes I look for them on Twitter, LinkedIn, Facebook, Instagram, Pinterest, local business gatherings, etc.
Only you can decide how far you’re willing to go to find them and build a connection with them.
2. Create a Social Media Blitz
Over 3 billion people around the world use social media.
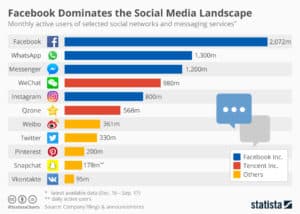
Image source: Statista
That’s massive and you should take a bite of that pie.
I believe you should focus on one social media platform. Avoid the impulse of having a presence on multiple social media platforms.
This might sound counterintuitive, but starting out having a presence on multiple social media platforms should be avoided at all costs. Master one platform first and then decide if it’s worth your time building a presence on the others.
I say this because it takes hard work to master one social media platform and if you try dominating multiple platforms at the same time you’ll spread yourself too thin.
All platforms have more than enough users to go around. Figure out which is best for you and focus all your energy into that one.
I don’t know what niche you’re in, but if you’re planning to blog about fashion Instagram is probably the best way to go. However, if you’re blogging about cooking recipes Pinterest is king.
Study your competitors … see which social media platforms they’re having the most success with and follow along. No need to reinvent the wheel — go with what’s proven to work in your niche.
3. Scavenge for Great Backlinks
Backlinks are like best friends. They tend to work best when they have things in common with you and the most popular they are, the bigger your reach.
Therefore, we don’t want to waste time scavenging for links that aren’t relevant to our blog’s.
I recommend that you read my post on how to get backlinks to your blog.
Beyond that, I want you to Google the following phrases:
- “[your blog post topic] links”
- “[your blog post topic] tips”
- “[your blog post topic] resources”
- “[your blog post topic] ways”
- “[your blog post topic] how to”
- “[your blog post topic] guide”
Gather the results and create a list of blogs you want to visit. See what the pages are about and find the contact info of the people in charge if you feel they are relevant.
Next, send them an e-mail explaining that you enjoyed reading their post and that you wrote a similar one. Tell them you would love to get their feedback and if you get a positive response, ask whether they’d consider adding a link to your post.
Expect a 5-10% success rate for your efforts.
Don’t get discouraged if your initial rates are lower. Keep going and test different email structures to see which ones provide you with the best results.
Remember… a few great links can make the difference between showing up on page 20, and being the star attraction of page one.
4. Email everyone you know
By this, I mean contacting everyone you know to let them know about the blog post you just published.
Ask them to share it on their social media profiles and to give you feedback on what they think of the post.
Your friends, family members, and acquaintances should be a major part of your promotion efforts.
Don’t be surprised to find you that some are more well connected than you thought.
5. Answer Related Questions on Quora
Quora is a question-and-answer website where questions are asked, answered, edited, and organized by its community of users.
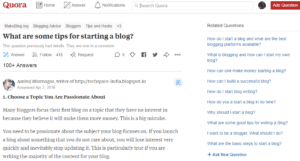
There are over 300 million active users on Quora, so if you haven’t heard of it… get familiar with it.
Visit Quora.com and search for questions related to your blog post.
Review the results and answer the questions you feel most comfortable with.
Provide as much detail as possible in your answers and drop a link to your related blog post somewhere within your answer for readers to get more knowledge on the subject.
Don’t be spammy or provide one sentence answers. Quora uses a voting process to display the best answers on top. Users will downvote your answer if they don’t find it useful.
6. Post to Aggregator Sites
Aggregator sites collect content from other websites and place them in one centralized location.
Readers love them because they can get the best information from around the web in one location.
How does this benefit you?
First, it puts you in front of new eyes and secondly, good aggregator websites are respectful of the content you provide them with and link out to you as the original source.
Below are some of the best aggregator sites:
- Reddit
- Largest aggregator site in the world.
- Digg
- One of the largest news aggregator sites in the world.
- Alltop
- Popular news aggregator site on all topics
- Popurls
- Another very popular news aggregator on all topics
- Techmeme
- Perhaps the best tech news aggregator around.
To submit your blog posts to any of the above aggregators visit their website and follow their instructions. If you’re experiencing problems finding their submission instructions, visit Google and do the following search:
- “[Aggregator site name] submit”
The top results should guide you directly to where you need to go.
Don’t spend too much time submitting your articles to aggregators websites. Find a good one that you feel comfortable with and submit them to that one.
The point of this exercise is to get as many eyeballs on your blog posts as possible, but I don’t want you spreading yourself too thin trying to submit your articles to a bunch of aggregator sites when there are better things you could be doing to grow your blog’s traffic.
7. Respond to Comments
If you’ve done a good job implementing steps 1-6, there’s a good chance your readers will start commenting on your blog posts.
Make sure you read all your comments and thank the people for leaving them. If it’s a question, answer it to the best of your abilities.
Interacting with your readers is key in building a strong bond with them. Everyone loves to be acknowledged and your new fans will appreciate you noticing them.
If done properly, you can expect most to become long term customers of yours.
8. Comment on Other Blogs
Implementing steps 1-3 makes this one a breeze.
Why?
- You already know who the influencers are in your niche.
- You have accumulated a list of relevant blogs posts on other websites.
Use that information to leave valuable comments on other people’s blogs.
Doing so will ensure that people in your niche start noticing you even they don’t know of your blog’s existence.
Also, people are curious, if they notice that you’re providing valuable information they will want to know more about you.
… And guess what?
That curiosity will lead them directly to your blog.
9. Remind Yourself to Refresh Constantly
This step will be put to use after you’ve blogged for about a year or so.
Google loves fresh content so updating old posts is a good way to keep Google happy. Doing so also provides your readers with the most up-to-date information on your topics.
Below are some ideas on how to refresh your post:
- Revise outdated information.
- Add new tips… for this article, I replace screenshots if Bluehost redesigns its website.
- Verify that all links still work and if not, remove or add a new one.
- Add or update images, screenshots, graphs, etc.
- Revisit the comments section to see if there are unanswered questions.
Don’t worry about updating blog posts that are under a year old.
8. The 9 Best Ways to Make Money Blogging (Monetize Your Blog)

You came here to learn how to start a blog and make money.
I purposely left making money for last because you can’t expect to make money before setting up your blog and growing its traffic.
Every blogger’s dream is to make money from their blog, but you must have a great foundation before you start cashing checks.
Follow the first seven steps put before you in this article and you’ll have the foundation required to monetize your blog.
Note: Blogging is hard and it’s a long-term investment. Yes, it will require a lot of your time, blood, sweat, and tears. However, it’s an investment that can pay massive dividends.
Now keep in mind that since you’re starting out, some of these monetization strategies will be easier and more appropriate than others. As your traffic grows, most of these strategies will be within your reach.
Let’s jump in!
#1. Affiliate Marketing

I placed affiliate marketing in the top spot because it’s my favorite and it’s a strategy that you can use to monetize your blog the moment it goes live.
Here’s how affiliate marketing works: You partner up with a company that has a product that you feel can benefit your readers. That company provides you with a trackable link that you can place anywhere on your blog. When someone clicks on that link and makes a purchase, then you earn a set fee or percentage of that sale.
Example: I host this blog on Bluehost. Because I like their service so much I decided to partner up with them to provide you with a great deal on their hosting services. They provided me with this unique link that tracks all the clicks and purchases made by my readers. Once you make a purchase, I get a commission at no additional cost to you.
I firmly believe the key to running a successful affiliate marketing campaign is to only partner up and recommend products that you actually use. Some bloggers recommend whatever products they can make money on and for some, it works, but many have a hard time explaining to their readers why they should spend their hard-earned money on so many products.
Now, if your blog is focused on reviewing products in the “XYZ” industry you’re probably going to recommend many products even if you don’t use them, but at minimum trying testing out the products for yourself before recommending them.
However, if you run a blog like mine, you’d be best served to partner up with 5-10 good companies whose products you use and you can easily show your readers how those products can benefit them.
Also, don’t hesitate to recommend free products to your audience just because you can make money by recommending something else. Trust me, the more useful you are to your readers, the more they’ll trust you and the easier it will be for them to become your customers.
Example: I love using Canva to edit graphics and Pixabay for finding free stock photos to use on my blog posts. They both have paid versions of their services, but I don’t use them so I recommend the free services instead.
Now that you know what affiliate marketing is all about, let’s talk about some of the most popular affiliate websites:
- Amazon Associates: Everyone knows Amazon. Joining their program allows you to make a commission on any product sold on their website.
- ShareASale: ShareASale is a marketplace that houses merchants catering to almost any niche you can think of.
- eBay Partners: Works similar to Amazon in that by joining their program you can make a commission on any product sold on their website.
- Clickbank: Much like ShareASale. Clickbank is a diverse marketplace filled with merchants that you pick-and-choose to promote on your blog.
- CJ Affiliate: One of the largest affiliate marketing networks. At CJ you’re bound to find a program that suits your needs.
- Shopify: With sales exceeding $41 billion last year, I am sure you can find a product to promote on this website.
Depending on your niche, you could also look for companies to directly partner up with as many companies like running their affiliate programs in-house.
Just run the following Google search: “company + affiliate program.”
That should get you going, but if you have difficulties finding affiliate programs within your niche let me know in the comments section or contact me directly and I’ll try to help you.
#2. Blog Ads
I hate blog ads but placing advertisements on blogs is one of, if not, the most popular ways that bloggers use to monetize their blogs.
Because of that, it would be unfair for me not to mention them here. If you want to know why I dislike blog ads visit the link above and decide for yourself.
Blog ads pay you in several different ways:
- Pay-per-click (PPC): You get paid a set amount when people click on the ad.
- Cost per Impression (CPM): You get paid based on 1,000 impressions of the ad.
- Cost per action (CPA): Payment based on a specific action caused by the ad.
As your blog’s traffic grows, you’ll receive inquiries from companies willing to pay you to run their ads. You usually make more this way, but until then you’re probably better off joining an ad network.
Below are some of the most popular ad networks:
- Google AdSense: The largest ad network in the world.
- Propeller Ads: One of the largest display and mobile advertising companies.
- Infolinks: Another popular ad network among bloggers.
- Mediavine: Full-service ad management company. Requires 25,000 sessions a month for approval.
- AdThrive: Same as Mediavine but requires a minimum of 100,000-page views for approval.
Outside of Mediavine and AdThrive, you can join the other ad networks regardless of your blog’s traffic. However, don’t expect to make a substantial amount of money until your traffic moves past the 20k mark.
#3. Freelancing (Selling Your Services)
If you want to start making money from your blog right now, then selling your services is the easiest way to do so.
First, you’ll need to go back to step 5 and create a page called “Hire Me” or “Work With Me.”
Beyond that, all you need is a strong enough sales pitch to convince people to use your services.
Having samples of previous works helps a lot, but if you don’t have samples don’t fret it. Use your blog as a canvas to showcase your skills.
Ideas for services you can sell:
- Writing
- Web Design
- Photography
- Video creation
- Website analysis
- Marketing
- Developing
- Editing
- Social media management
- Virtual assistance
- Translation
- SEO or paid advertising campaigns
- Project management
- Product sourcing
- Accountant
The list can go on and on because the moment you learn how to start a blog… any service can be monetized through it.
#4. Physical Products
You can literally sell any physical product you want from your blog. Be it a car or a $10 t-shirt with you log on it.
The only downside to monetizing your blog through the sales of physical products is that they need to be created, stored, and shipped — all of which takes time and money.
If you have the time and money to create the physical product, as well as the space to store it, this could be an excellent strategy for monetizing your blog.
If not, the only other option would be to sell another companies product and have them ship it directly to the buyer (dropshipping).
#5. Sponsored Blog Posts
Many bloggers love to monetize their blogs through sponsored posts.
Starting out with no traffic makes it difficult to make money with this strategy. However, the moment your blog’s traffic starts to pick up you can start earning via sponsored posts.
Sponsored posts work in several ways:
- You write a blog post about a product and get paid for it. Regardless of sales.
- You mention a brand or product within a post and get paid for it.
- Outsider writes a post that is published on your blog and you get paid.
You can get as creative as you want when it comes to sponsored posts.
The fees you charge are completely up to you. You’ll get many offers for sponsored posts once your blog starts getting noticed, but it’s up to you to decide if you’re willing to accept them or ask for a higher fee.
Usually the more targeted your audience, the higher the fee you’ll receive from potential partners. This is because your potential sponsors will expect higher returns on their investment the more targeted your audience is.
Try to not oversaturate your blog with sponsored posts. Write at least two normal posts per sponsored post.
Lastly, you don’t have to wait for companies to contact you about sponsor opportunities. You can get a head start by contacting companies that you feel could benefit from sponsoring posts on your blog.
#6. Online Courses and Workshops

Do you possess a skill that you feel others would be interested in learning?
If so, you could easily build an online course or workshop around it.
It doesn’t have to be anything fancy either. This post teaches my readers how to start a blog and make money. Once published, I’ll probably receive a lot of inquiries from people who are still struggling to start their blog or not making any money from it.
Some people just don’t have it in them to read something online and try it out on their own. Therefore, I could easily build an online course or workshop teaching people how to start a blog and make money.
You don’t have to be an expert either… you just have to know more than most people. Do your research though, don’t build a course on flipping houses if you’ve never even bought one.
One of the major benefits of using online courses and workshops as a way to monetize your blog is that you don’t need a huge audience to make it work.
Let’s say you have 1,000 monthly visitors and you decide to start a course on how to outsource product sourcing to the Philippines. If you charge $100 for the course, all you need to do is get 1% of your monthly visitors to purchase your course to make $1,000.
Another great thing about this strategy is that you can get others to sell for you by building an affiliate program that other bloggers can join.
#7. Digital Products and Downloads
Next up, you can create digital products or downloadable assets as a way to monetize your blog.
Instead of using sponsored posts or joining an affiliate marketing program in which you promote someone else’s product, you can use your blog to promote and sell your own material.
This can be anything from an ebook on how to properly milk crows, to a blog post writing checklist… just depends on what niche you’re in.
Remember: Your readers already enjoy reading your content for free, so it’s logical that some would be willing to spend a few dollars to gain access to advanced material.
Your job is to provide them with information that goes above and beyond what you provide for free in your blog.
#8. Business Partnerships
Of all the ways to monetize your blog, this is the wildest one. Who knows who you’ll meet because of your blog.
The possibilities for stumbling into an unknown partnership opportunity are endless.
Keep an open mind as the more popularity your blog gains, the more partnership opportunities you’ll come across.
On the flip side, if there’s someone in your space that you want to work with, strategize on how you can add value to their business and contact them once you have everything in place.
#9. Flipping
Last but not least… flipping.
Once you get the hang of how to start a blog and monetize it, you might move into the space of flipping blogs.
The concept here is to start a new blog and sell it for a profit.
That might sound crazy to you right now, but once you gain connections and learn the ins and outs of how to grow a blog’s traffic it will be easy for you to get into the business of flipping blogs.
Believe it or not, there are websites such as Flippa that work as a marketplace for selling websites.
Oh and by the way… There’s over $1.2bn in available funds from Flippa’s collective buyer pool.
***BONUS*** My Favorite WordPress Plugins
Plugins are developed to allow you to add all sorts of features to your blog.
The biggest problem is that, like themes, there are millions to choose from. And if you add too many, they can cripple your blog’s performance.
To help you cut through the noise… these are my favorite plugins to install the moment you get your blog set up.
Yoast SEO: Of all the plugins mentioned in this section, this is the one you can’t survive without. SEO is too important to your blog’s success and Yoast SEO keeps you on top of it without all the technicalities.
MonsterInsights: Keeping track of your blog’s incoming traffic is a must and Monsterinsights is the best Google Analytic installation plugin available on WordPress.
W3 Total Cache: This plugin optimizes your hosting server to help with your blog’s load time.

ShortPixel Image Optimizer: Images take up a lot of space. This plugin helps reduce image size so that your blog loads faster.
Social Warfare: You already know how important social media is to the success of your blog. Adding share icons to your blog posts so that your readers can easily share them is a must… that’s what Social Warface is for.
Autoptimize: Page load speed is crucial to ranking well on Google and also provides a better user experience. This plugin optimizes different aspects of your blog to speed up its load time.
Easy Table of Contents: I have minimal understanding of HTML coding. Therefore, when I want to use a table of contents to provide you with an easier way to navigate my articles, I use this plugin.
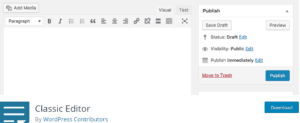
Classic Editor: I’m a traditionalist when it comes to WordPress. Not too fond of the new post editor, therefore I use this plugin to stick with what I’m used to.
Akismet Anti-Spam: The moment your blog starts picking up steam, is the moment spammers try to take over your comments section. Akismet prevents spammy comments from slipping through.
***BONUS EXTRA*** Useful Tools and Websites
Below is a collection of my favorite tools and websites. Without them, this blog probably wouldn’t even exist.
Google: Even before I became a full-time blogger Google was my favorite website. Now, I couldn’t imagine what my life would be without it. Simply put, I use Google to
Canva: Don’t feel like spending hundreds on photo editing software? Neither do I, and that’s why I use Canva to edit images — it’s free and an abundance of features to handle all your photo editing needs.

Pixabay: Want access to millions of free images and royalty free stock photos? Pixabay has you covered.
Grammarly: I previously mentioned that English is my second language. Therefore, I can use all the help I can get when it comes to grammar and spelling which is where Grammarly comes in. By far the best tool I have used for finding and correcting errors in my writing.
Thesaurus: If you’re ever unsure about the meaning of a word or need a list of synonyms, this is the place to visit.
Buzzsumo: Great for analyzing what content performs well in your niche.
Moz: I visit this specific link on Moz once a month to stay on top of Google algorithm changes.
Problogger: Darren Rowse is one of the most influential bloggers in the world. I consider his blog must-read for all bloggers, regardless of niche.
WordPress: I try my best to keep up with WordPress news and announcements and this is the place for that.
Tiny Buddha: No, it’s not a religious blog so don’t be scared… it focuses on things such as kindness, compassion, gratitude, mindfulness, selflessness, and non-attachment — all of which I consider important to our well-being.
Neil Patel: Easily the most influential person in my blogging career.
How to Start a Blog FAQ
1. What is a blog?
You’ll find many different definitions of what a blog is around the web.
To me, a blog is a website that’s run by an individual or company that provides useful information to its readers.
2. Why should I start a new blog in 2021?
Everybody’s reasoning is different.
I started this blog because I wanted to spend more time with my family and create more freedom for myself to do the things I wasn’t able to do while working in the corporate world.
Can’t speak for yourself but here are 13 reasons why you should start a blog today.
3. Must I use BlueHost?
No, I decided to use BlueHost on my blog because they are reliable, affordable, have great customer service, and are highly recommended by WordPress. And because I am so happy with them, I decided to partner up with them to get you a better deal if you choose to use them.
However, there are other great web hosts out there such as SiteGround and WPengine. I have never used them so I cannot speak about them from a point of experience, but they both have great reputations and I’ve heard great things about them.
4. Why don’t you recommend free blogging platforms such as Medium and Blogger?
I consider Medium, Blogger, and all other free blogging platforms as good alternatives for people looking to start blogging as a hobby.
However, if you’re looking to make money, these free platforms hinder your ability to do so. They “own” you so even though they want you to succeed, they will always have their own best interest above all else.
Also, because you don’t own your blog they can restrict your use of ads, affiliates, and any form of income generation you might have. Some don’t even allow ads which is one of the main drivers of income for many bloggers.
Another reason is that it looks unprofessional. Your address is normally something like this “bloggingpals.blogspot.com.” And on top of looking unprofessional it’s much harder to remember because of the additional words you must type to get to it.
Lastly, because you don’t have as much design freedom as you do with your own WordPress blog.
5. How much money can I make blogging?
Nobody can answer this question for you. The only thing I can say is that the possibilities are endless.
Most bloggers never make money because they quit or don’t put in the effort necessary to do so. However, if you’re willing to bust your behind off and do whatever it takes to make it work… Sign yourself a blank check and decide how much you want to put on it.
6. How often should I publish a new post?
That depends on you and how much time you have available. I personally publish three blog posts per week because it’s a perfect amount for me.
Keep in mind, that in order to become a successful blogger you must be more than just a writer. You should actually be spending more time promoting your blog posts than writing them.
Don’t forget that when deciding how often to publish new blog posts. There’s no point in publishing every day if you cannot get eyes on them because you have no time for promotion.
Lastly, once you decide on a publishing schedule, be consistent. Don’t deviate.
7. How long before my blogs traffic starts growing?
This is a tough nut to crack. You could start seeing traffic right away if you chose to run paid ads. However, we aren’t here to spend money on traffic.
Depending on how much time you spend writing, promoting, and engaging with your readers you should start seeing significant traffic growth around your 6th month.
That’s assuming your main source of traffic is Google. However, you can speed up your blog’s traffic growth by growing your social media following and by making friends with influencers.
If you hit it off with your audience on social media, your traffic can see exponential growth much quicker. Using influencers is another great way of growing your traffic quickly.
8. What’s the best way to contact you?
The best way to get a hold of me is through the contact page on this blog.
9. Can you recommend a good web design firm if I want to hire someone to do this for me?
Yes, Unique Web Designer is a Fort Lauderdale web design agency that has help many clients create personal blogs and business pages.
Summary
You don’t have to be a rocket scientist to learn how to start a new blog in 2021.
Starting a blog is simple so long as you have the right guidance.
In this post, I teach you how to start a blog in 2021, promote it, and make money.
I hope you find it useful.
Please share this post and let me know what you think of it in the comments section below.
Additional FAQ’s On How To Start A Blog:
How do bloggers get paid in 2021?
Bloggers get paid in many ways. Here are some of the most popular ways: 1. Placing ads on their blog. 2. Selling products such as eBooks, and courses. 3. Affiliate marketing (earning a commission by selling other people's products and services). 4. Selling their own services. 5. Selling their blog.
Should I start a blog in 2021?
The short answer is yes. If you want to become a blogger to earn a side income or to replace your current salary there has been no better time to start a blog than now. Today's technology has made it so that anyone, even without having a technical background, can start a blog in 20 minutes.
How much does it cost to start a blog in 2021?
The cost to start a blog ranges, but the bare minimum is about $49 per year. That price includes your monthly hosting fee (normally paid yearly), and the registration of your domain name (the blog name).
How do I start a blog for free?
You can start a free blog using blogging sites such as blogger and medium. However, I do not recommend doing so if you want to make money from your blog, because the free blogging platforms usually limit your ways of earning money.
How do you create a successful blog in 2021?
In order to create a successful blog you must do the following: 1. Choose your hosting company 2. Choose a topic 3. Choose a domain name (blog name) 4. Create content 5. Promote that content to generate traffic 6. Choose how you want to monetize the blog
